Custom Domains
Introduction
Using a custom domain with your pod allows you to make it available under your own name and brand, like blog.joedoe.com. This is a great way to make it consistent with other websites and email. If you already own a domain, you can use it with your pod in an instant. It will then be reachable as e.g. status.my-domain.com or my-domain.com.
If you don’t have a domain yet, it’s also easy to register one. Domaintyper is a good starting point to find available domains. To compare prices, we like TLDes (no affiliation). See the video below to see the full process from buying a domain to setting it up with PikaPods.
Using Custom Domains
To use your own domain, you need to add a CNAME or ALIAS record and set your pod’s pikapod.net domain as target.
We will also apply for a free SSL certificate for each mapped domain. This ensures all data going to your pod is encrypted. It can take a few minutes before the pod is reachable from the new domain. You may see an error before this.
Steps to use a custom domain:
- Open Pod Settings and then the Domain tab.
- Enable Custom Domain. Take note of your pod’s
xxx-yyy.pikapod.netsubdomain - Ensure no CAA records are set that may prevent us from applying for an SSL certificate. If you already use CAA, please also add
sectigo.com, as mentioned here, andletsencrypt.org, as mentioned here. -
Then, depending on if you want to map a subdomain (e.g.
status.my-domain.com) or root (apex) domain (e.g.my-domain.com):CNAMErecord for subdomains:status.my-domain.com. 3600 IN CNAME xxx-yyy.pikapod.netALIASrecord for root domains:@ 3600 IN ALIAS xxx-yyy.pikapod.net - Use a tool like DNS Checker to ensure the record for your domain shows your
pikapod.netdomain or the same IP. - Finally, add the new domain in the PikaPods control panel. If the setup is correct, it will be verified and saved.
After adding a domain, we will periodically check if DNS is still set up correctly. If there is any issue you will receive a notification.
Only one custom domain can be mapped per pod. If you need additional alias domains, you will need to set up redirects with your DNS provider or a service like Freedirector (free, no signup needed) or redirect.pizza (free tier). When using Cloudflare, you can also use redirect rules, as described in this blog post.
Cloudflare
You can use Cloudflare with (orange cloud) or without (grey cloud) proxy feature. The orange cloud means all traffic will first go to Cloudflare and then to your pod. Grey cloud means Cloudflare just tells your browser where to find the pod, but then the connection is direct.
Usually no additional steps are needed for either option. Since we will still issue a real SSL certificate for your custom domain, the following steps are recommended, if you encounter any issues:
- In Cloudflare, add the DNS record DNS-only first (grey cloud).
- Enable the custom domain in PikaPods and wait until it loads over HTTPS — the certificate is issued directly during this step.
- (Optional) Switch the record to Proxied (orange cloud) and set SSL/TLS to Full (strict).
If you want to restrict your pod to only receive traffic from Cloudflare and block direct access, you can enable our Firewall feature and select to Also allow Cloudflare IPs in addition to your own IP.
Common Issues with Cloudflare
Cloudflare SSL/TLS settings: If you proxy your domain through Cloudflare (orange cloud), set SSL/TLS → Overview → encryption mode to Full (strict). Your pod automatically obtains a valid Let’s Encrypt certificate, so Full (strict) — the most secure option — works out of the box. Do not use “Flexible” (it causes redirect loops and isn’t encrypted to your pod), and don’t leave the mode on “Automatic.”
Web application firewall (WAF): If you use Cloudflare’s proxy feature, it’s possible that our monitoring will get blocked and we can no longer determine if your pod is available on its custom domain, and we can’t renew the encryption certificate for your custom domain. In this case, please ensure you have an exception added for the path /.well-known/* in Security > WAF, as described above.
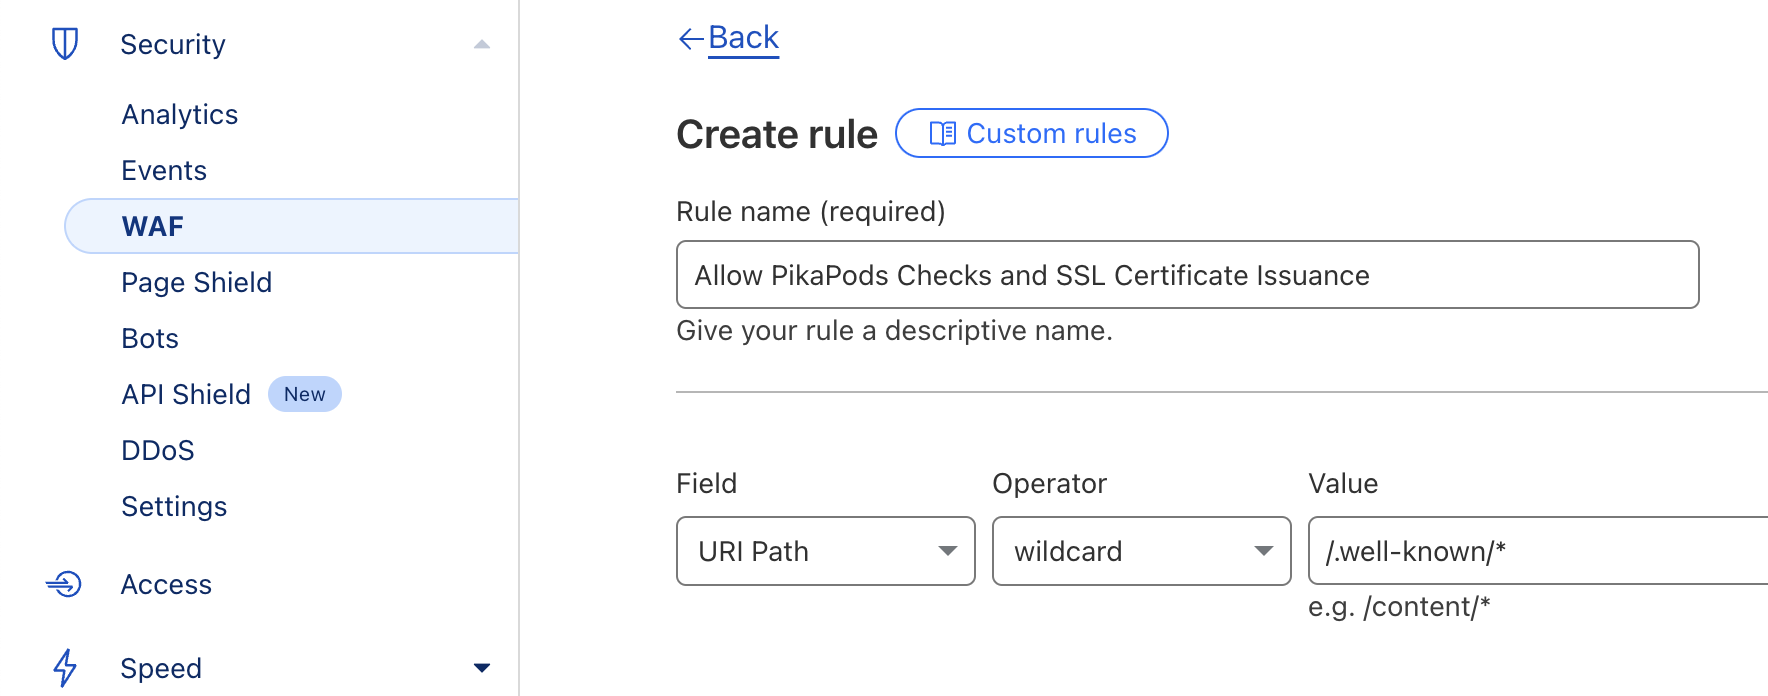
When creating the skip rule for the path /.well-known/, select *All managed rules under “WAF components to skip”. This is the key one, as Cloudflare’s managed rules are what could block the ACME certificate challenge requests we use to renew your SSL certificate.
You can also tick All remaining custom rules if you want to be safe, but it’s only necessary if you have your own custom WAF rules that might also match that path.